Building this Blog with Gatsby, React and Markdown
July 01, 2023 - 8 min read (1537 words)
I ran across GatsbyJS in a video on Azure Static Web Apps which I have been using for a variety of projects and quickly became impressed with the framework and the open source ecosystem around it. After a few test runs, I selected it as the engine for this blog.
Gatsby enables developers to build fast, secure, and powerful websites using a React-based framework and innovative data layer that makes integrating different content, APIs, and services into one web experience incredibly simple.

Features that I was seeking for my implementation included:
- Blazing speed and optimization for Core Web Vitals
- Search Engine Optimization
- Sitemap generation
- Web manifest and Progressive Web App support
- Automated image optimization
- Complete control over customization
- A familiar component framework (React)
- Markdown as they primary platform for content authoring
The evolving GitHub repository storing this blog and its implementation can be found here.
Table of Contents
Key Package Versions
I enjoy both the occasional pain and benefits of staying on the bleeding edge with personal projects. As a result, I started with very current versions of several key Gatsby packages. At the time of this writing, some of those packages were released in the last several weeks. As a result, I reaped a number of benefits. However, several of the Gatsby starter templates and a few plugins had a few issues that needed to be worked through.
"dependencies": {
    ...
    "gatsby": "^5.11.0",    "gatsby-plugin-google-gtag": "^5.11.0",
    "gatsby-plugin-image": "^3.11.0",
    "gatsby-plugin-local-search": "^2.0.1",
    "gatsby-plugin-manifest": "^5.11.0",
    "gatsby-plugin-mdx": "^5.11.0",
    "gatsby-plugin-offline": "^6.11.0",
    "gatsby-plugin-react-helmet": "^6.11.0",
    "gatsby-plugin-sass": "^6.11.0",
    "gatsby-plugin-sharp": "^5.11.0",
    "gatsby-plugin-sitemap": "^6.11.0",
    "gatsby-plugin-styled-components": "^6.11.0",
    "gatsby-plugin-typography": "^5.11.0",
    "gatsby-remark-autolink-headers": "^6.11.0",
    "gatsby-remark-code-titles": "^1.1.0",
    "gatsby-remark-copy-linked-files": "^6.11.0",
    "gatsby-remark-images": "^7.11.0",
    "gatsby-remark-prismjs": "^7.11.0",
    "gatsby-remark-responsive-iframe": "^6.11.1",
    "gatsby-remark-smartypants": "^6.11.0",
    "gatsby-source-filesystem": "^5.11.0",
    "gatsby-transformer-sharp": "^5.11.0",
    "prismjs": "^1.29.0",    ...
    "react": "^18.2.0",    ...
    "react-dom": "^18.2.0",    ...
},
"devDependencies": {
    "gatsby-cli": "^5.11.0",    "gatsby-plugin-root-import": "^2.0.9",
    "prettier": "^2.8.8",
    "resolve-url-loader": "^5.0.0"
},
Getting Started
This post assumes that a few things are in place in your development environment. A good quick start article is available on the Gatsby site.
- Node.js v18 or newer
- Git
- A package manager is in place (Yarn)
- An editor or IDE (Visual Studio Code)
Install Gatsby Globally
It is best to install gatsby at a global level using your package manager to get started.
yarn global add gatsby-cliHowever, once you are up and running with fully initialized
repository it is possible to use a specific version controlled by your
package.json in your devDependencies section.
"devDependencies": {
    "gatsby-cli": "^5.11.0",    "gatsby-plugin-root-import": "^2.0.9",
    "prettier": "^2.8.8",
    "resolve-url-loader": "^5.0.0"
},
Using Starters
Gatsby and the community offer a series of starters. I pieced together a custom starting point by creating several starter sites and pulling code from each into my own repository. Creating an example site from a starter uses the following command:
yarn gatsby new [NEW-SITE-NAME-HERE] [REPOSITORY-LINK-HERE]
info Creating new site from git:
https://github.com/gatsbyjs/gatsby-starter-blog.git

Cloning into 'example'...
remote: Enumerating objects: 41, done.
remote: Counting objects: 100% (41/41), done.
remote: Compressing objects: 100% (34/34), done.
remote: Total 41 (delta 1), reused 23 (delta 0), pack-reused 0
Receiving objects: 100% (41/41), 1.12 MiB | 5.95 MiB/s, done.
success Created starter directory layout
info Installing packages...

yarn install v1.22.19
info No lockfile found.
[1/4] 🔍  Resolving packages...
...
[2/4] 🚚  Fetching packages...
[3/4] 🔗  Linking dependencies...
...
[4/4] 🔨  Building fresh packages...
success Saved lockfile.
info Initializing git in example
...
Your new Gatsby site has been successfully bootstrapped. Start developing it by
running:

  cd example
  gatsby develop
I used a number of starter examples as source material for creating a custom version. The primary source starters I utilized are listed here:
- https://github.com/gatsbyjs/gatsby-starter-blog
- https://github.com/rwieruch/gatsby-mdx-blog-starter-project
Key Development and Build Commands
Once you have either initialized a starter or pieced together a starting point in
your own custom implementation, there are a series of key commands needed to run
the development environment, build system and source code prettier. I have these
pulled together in package.json to be run with yarn.
"scripts": {
    "build": "gatsby build",
    "develop": "gatsby develop",
    "format": "prettier --write \"**/*.{js,mjs,jsx,ts,tsx,json,md,mdx}\"",
    "start": "gatsby develop",
    "serve": "gatsby serve",
    "clean": "gatsby clean",
    "test": "echo \"Write tests! -> https://gatsby.dev/unit-testing\" && exit 1"
}
Running in Development Mode
To run the site in the development environment, the following commands can be used. Changes to most files will be immediately picked up, built and served through develop mode. This is a useful way to preview live edits to the site.
yarn develop
yarn run v1.22.19
$ gatsby develop
...
⠀
You can now view personal-site-blog in the browser.
⠀
  http://localhost:8000/
⠀
View GraphiQL, an in-browser IDE, to explore your site's data and schema
⠀
  http://localhost:8000/___graphql
⠀
Note that the development build is not optimized.
To create a production build, use gatsby build
⠀
success Building development bundle - 14.195s
success Writing page-data.json and slice-data.json files to public directory -
0.087s - 3/6 68.60/s
Cleaning
Cleaning the output and cache directories can be accomplished with the following command.
Pro Tip: Run a clean following any chances to gatsby-config.js or
gatsby-node.js to ensure that the development environment picks up the
correct resulting output files.
yarn run v1.22.19
$ gatsby clean
info Deleting .cache, public,
/Users/josephpfulton/repos/blog/node_modules/.cache/babel-loader,
/Users/josephpfulton/repos/blog/node_modules/.cache/terser-webpack-plugin
info Successfully deleted directories

✨  Done in 1.70s.
Pro Tip: These directories should be included in your .gitignore file
to avoid commits including them to a repository. I used the Node .gitignore
template for a starting point to my .gitignore file which included nearly
everything that was needed.
# Gatsby Outputs
.cache
public/
Creating and Locally Serving a Production Build
Running a production build and then serving those outputs locally can be accomplished with the following commands. Some plugins notably only render their outputs in production mode.
yarn buildyarn serve
yarn run v1.22.19
$ gatsby serve
⠀
You can now view personal-site-blog in the browser.
⠀
http://localhost:9000/Prettier the Source Code
Running the prettier package is accomplished using the following commands.
It nicely cleans up many code formatting issues.
Pro Tip: Run a yarn clean in advance of this command to avoid formatting
output files.
yarn formatMajor Components and Built in Technologies
Gatsby is built upon React components, GraphQL and a plugin system. I was looking for an engine that was built upon familiar technologies and this selection fit the bill. Building using these selections makes things feel friendly and fast.
React Components
React components are JavaScript functions and are based on a project supported by Meta Open Source. They are composable and are written in a syntax that merges markup and JavaScript.
function Video({ video }) {
  return (
    <div>
      <Thumbnail video={video} />
      <a href={video.url}>
        <h3>{video.title}</h3>
        <p>{video.description}</p>
      </a>
      <LikeButton video={video} />
    </div>
  );
}
GraphQL
GraphQL, in Gatsby, is a mechanism to describe the site and provide queries against that data. Generally, pages and components declare a query to gather the data they require to render. Then they bind the results of those queries to inputs to the React components.
GraphQL is a query language for your API, and a server-side runtime for executing queries using a type system you define for your data. GraphQL isn’t tied to any specific database or storage engine and is instead backed by your existing code and data.
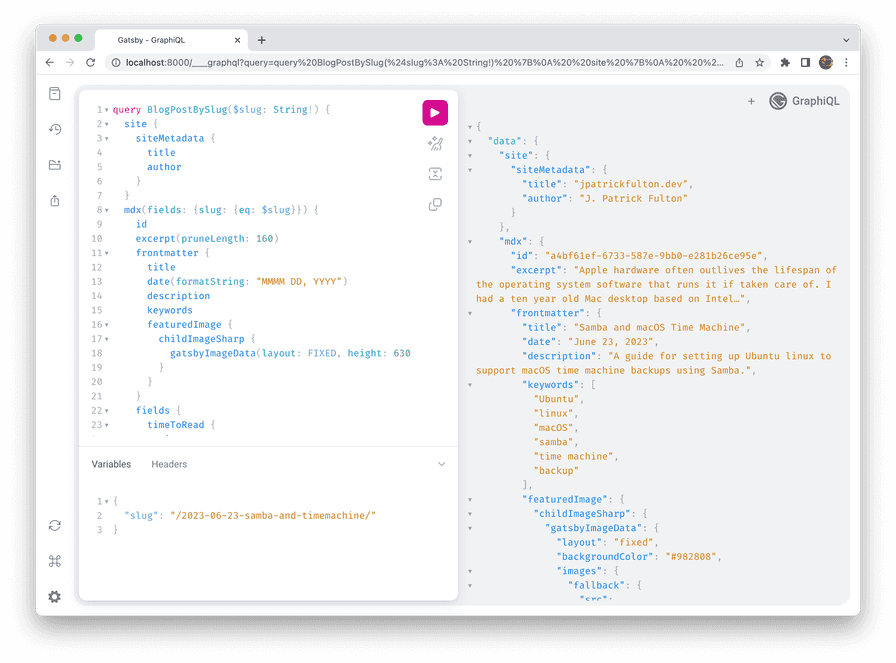
Included in the Gatsby development environment is GraphiQL.
GraphiQL is the GraphQL integrated development environment (IDE). It’s a powerful (and all-around awesome) tool you’ll use often while building Gatsby websites. It offers syntax highlighting, intellisense autocompletion, automatic documentation, and much more.

GraphiQL allows the developer to test and run GraphQL queries against the Gatsby site metadata. Those queries can then be copied into pages and components for use in the renderer.
const { site, openGraphDefaultImage } = useStaticQuery(
    graphql`
      query {
        site {
          siteMetadata {
            title
            description
            author
            siteUrl
            social {
              twitter
            }
          }
        }
        openGraphDefaultImage: file(relativePath: { eq: "open-graph/code.png" }) {
          childImageSharp {
            gatsbyImageData(layout: FIXED, height: 580, width: 1200)
          }
        }
      }
    `
  );
Plugin Ecosystem
Gatsby has a rich plugin ecosystem. Most are listed in the official site. However, a number can be found on blogs and articles that are only published to npm.
Plugins allow features to be added to sites with what is generally very low
effort. Plugin configuration can be found in gatsby-config.js.
A guide to authoring your own plugins is available here.
Appendix: Plugins in Use
I selected a variety of key plugins that worked with the current version of Gatsby.

Written by J. Patrick Fulton.